This is part three of a series on dealing with the deployment of native assemblies referenced by managed code. Make sure to check out part one and part two for context.
In our first attempt at dealing with platform-specific native assemblies, we created separate builds of our managed software, one targeting x64, and one targeting x86. In our second attempt, we improved upon that design by loading the correct native assembly at runtime, allowing us to create a single deployable artifact that works on both platforms. In this episode, we will eliminate the need to “copy around” those native assemblies by embedding them into our assembly and extracting them at runtime.
Returning to our “unmanaged demo” example, the first step is to convert our references to the native assembly to “embedded resource” references. Select both versions of the un-managed DLL and, in the properties grid, change “Build Action” to “Embedded Resource” and “Copy to Output Directory” to “Do not copy”:

This instructs the compiler to embed the file into the output assembly, rather than simply copy it to the output directory.
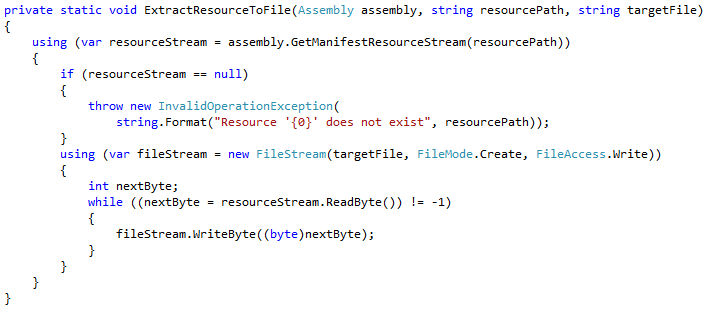
Unfortunately, this change has broken our application, because “Unmanaged.dll” is no longer present in the expected “x64” and “x86” sub-directories of the output folder. At runtime, we now need to extract the embedded unmanaged DLL. The first thing we will need is a small helper function to extract an embedded resource to a file:

We need a new public function that will allow clients to “extract and load” native DLLs using our new mechanism:
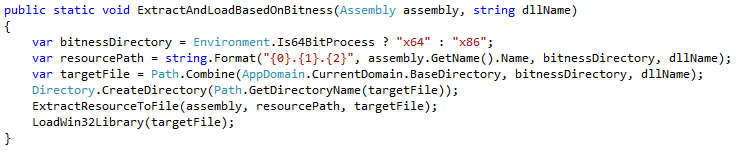
Of note is the fact that the name of the resource follows the pattern “DEFAULT_NAMESPACE.FOLDER.FILE”. The method above uses the name of the assembly as a stand-in for the default namespace. Generally, it is recommended to have the assembly name be the same as the default namespace, so this is probably good enough.
Finally, we must call our new helper function in our wrapper class’ static constructor:

Voila! We have a working application again, and we don’t need to explicitly distribute the native DLL — it now hitches a ride with its managed host. However, there are problems with this approach. First, consider what happens when we launch multiple instances of the application simultaneously. The first will succeed, but subsequent attempts will fail because they cannot write out the native DLL (as it is already loaded by the first instance). In addition, our approach here writes files out to the install directory, which is generally frowned upon. I see two basic solutions to the problem:
- Write the DLL to a unique directory in the TEMP folder (perhaps generated using a GUID). This approach introduces the problem of how to remove the temporary DLL when we are finished with it. It is bad form to simply let temporary folders and files pile up.
- Write the DLL to a known directory, and skip writing it out if it already exists (on the assumption that it was created by another run of our application). This approach could cause trouble around upgrades – you want to ensure that the DLL is re-written with every re-deployment of your application. You can also run into race conditions if multiple instances of the application are starting up simultaneously — if you use this approach, consider using a named mutex to synchronize access to the file.
We have now explored several approaches to the deployment of native DLLs referenced by managed code. Hopefully you have gained a good understanding of the problem and some of the solutions that are available, and the pros and cons of each. I leave it up to you to determine the best approach for your organization. Happy referencing!