One of the nicest things about .NET is that it hides (most) of the complexity of dealing with different processor architectures, most notably the distinction between 32-bit and 64-bit (x86 and x64). Typically, you are safe to just target the “Any CPU” platform and let the runtime handle things. However, if you need to reference un-managed code, your code will need to deal with the fact that the un-managed DLL will only work on a particular processor.
To demonstrate platform-aware un-managed references, I’ve created a small C++ dll that exports a single function :

I’ve compiled it to a dll called “Unmanaged.dll” in both Win32 (32-bit) and x64 (64-bit). The function will return 4 under 32-bit and 8 under 64-bit, as you would expect. The next step is to reference this from a .NET application. I’ve created the following console app (“UnmanagedDemo”) in C# to do so:

If we simply try to run this app as-is, we will get a lovely exception:

As the exception tells us, Unmanaged.dll simply is not there — it cannot be loaded into our process because it is not in our .NET application’s output directory. We will need to “reference” it. But an un-managed dll cannot be “referenced” like a .NET assembly, so we need to explicitly include it in our project in order to get it included in the output. To do so, right-click the project and select “Add -> Existing Item”. Navigate to the un-managed assembly you want to include (I put them in a “ref” directory under my solution folder), select it, then make sure to select “Add As Link” by clicking the little down arrow next to the “Add” button. Clicking “Add” will make a copy of the item, which we don’t want.

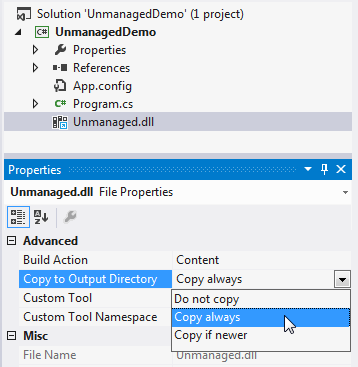
To start, I’ve added the “Win32” version of Unmanaged.dll (we will deal with the 64 bit complexity in a bit). Finally, we need to tell the compiler to copy the un-managed dll to the output directory. Right-click the dll (which is now included in your project), select “Properties”, then from the Properties window, change the “Copy to Output Directory” setting to “Copy always”.

We can now run our demo app, which will succeed:

Our C# code called into the 32-bit version of Unmanaged.dll, which told it that the size of a pointer is four bytes. But wait. I’m running on a 64-bit machine and I compiled my C# app as AnyCPU. Shouldn’t the CLR run my app in 64-bit mode? That’s how things worked prior to VS11 and .NET 4.5. Now, there is a new “Any CPU 32-bit Preferred” mode, which is the new default. In this mode, the CLR will run your app in the 32-bit emulator on a 64-bit machine. The only difference between this mode and x86 is that it can run on a 32-bit ARM processor (yay tablets!). Let’s see what happens if we restore the old “Any CPU” behavior by switching off the “Prefer 32-bit” flag in our project’s Properties:

If we run under this configuration, the app blows up on us:

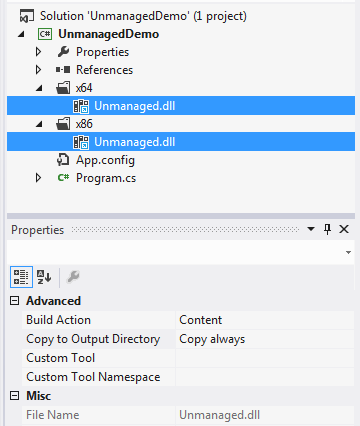
This time, we get our old friend, the BadImageFormatException, because the CLR ran our C# app in 64-bit mode, and it was unable to load the 32-bit Unmanaged.dll. If we want to be able to run our C# application in both 64-bit and 32-bit mode, we’ll have to compile two versions and reference the correct version of Unamanged.dll in each. To start, let’s abandon the “Any CPU” target, and add explicit x86 and x64 platform configurations. To do so, right click the solution and open up the “Configuration Manager”. Select the drop-down under “Platform” for the project (not the solution) and select “New…”

Use this dialog to create new x86 and x64 platform configurations for your project (this will also add solution-level platform configurations). Go ahead and remove the “Any CPU” configuration using the “Edit…” dialog (BOTH for the project AND the solution). Double-check that your solution and project platform configurations line up (that the project will build “x86” when the solution is configured to build “x86”, etc) and close out of the Configuration Manager.
ProTip: Remember that even though the platform configuration is “x86”, the platform target may not be. Double check that the “Platform target” on the “Build” screen of the project’s properties matches the “Platform” configuration.

Recall that we referenced the “Win32” version of our Unmanaged.dll. This means that if we run our C# app under the “x86” configuration, it will work. It will fail if we run under the “x64” configuration (in the same way it failed when we ran “AnyCPU” with “Prefer 32-bit” turned off). To get it to work in both modes, we will have to conditionally include the correct version of Unmanaged.dll based on the platform configuration. To do so, we’ll need to open up our csproj file in a text editor (this trick can’t be pulled off from the UI, sorry). In the text editor, locate the “ItemGroup” that includes Unmanaged.dll as content:

We are going to abstract away that path (..\ref\Win32) into a property that will change based on conditions (remember that a csproj file is just an MSBuild script, so we can declare properties and programmatically set them). First, declare a PropertyGroup that declares a variable whose value is the current path. Reference that property in the “Include” statement:

This didn’t change any behavior, we just moved the path out into a variable. To change behavior, we add another PropertyGroup that will only be called when we are building “x64”. Here, we set our variable to the path to the 64-bit version of the un-managed assembly:

Now we are all set. If we go back to Visual Studio, we are now able to successfully run our application in the “x86” and “x64” configurations. Here’s the output when we run x64:

There you have it. You now have the power to create dual-platform .NET applications that use un-managed assemblies!
Update: Check out our follow-up post on this topic, which explores a way to reference a native DLL that eliminates the need for platform-specific build configurations. Part three eliminates the need to copy the native DLL by embedding it into the managed assembly.