 In “Manage Windows Services Remotely” we talked about using “services.msc” to connect to a remote Windows computer and manage its services. While that’s all well and good for one server, it can get tedious manually connecting your services.msc to remote computers all the time, especially if you have a set of multiple servers for which you are responsible. Here we’ll show you how you can create one Services MMC to rule them all.
First, fire up an empty MMC console from your workstation’s Start Menu. Remember, MMC stands for Microsoft Management Console and has a variety of uses for Windows system administrators.

You’ll see an empty “Console1” MMC window appear like the following.

Next, in the MMC console window, click the File menu and select “Add/Remove Snap In…” from the menu.

In the “Add or Remove Snap-ins” dialog, in the left list box under “Available snap-ins”, search for the Services snap-in. Select it and click the “Add >” button in the middle of the window.

In the next Services dialog window that opens, select “Another computer” and enter in the hostname of the server to which you want to connect one of your Services MMCs. Then click the Finish button to close the Services dialog.

Next, back in the “Add or Remove Snap-ins” dialog, in the right list box under “Selected snap-ins”, select your newly added Services snap-in, and click the “Edit Extensions” button to the right.

In the “Extensions for Services” dialog that opens, select the “Enable only selected extensions” radio button and uncheck the “Extended View” option below it. This helps remove some of the unnecessary “chrome” in the typical Services MMC, thus saving a little bit of screen real estate. For those who are interested, the Extended View chrome gives you a little side bar that shows the service description and some additional links to Start, Stop, or Restart the service; not a terribly useful option in our opinion.
After you’ve unchecked Extended View, click OK to close the “Extensions for Services” dialog.

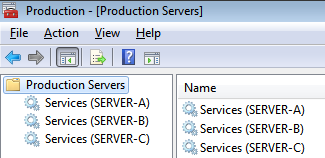
Repeat these steps (go to the MMC’s File menu, select “Add/Remove Snap-in..”, and so on) until you’ve added all of the servers you’re interested in to this single MMC console. Then, back in the “Console1” MMC window, right click the “Console Root” folder icon in the left hand tree view and select “Rename” from the context menu, and give the folder a descriptive name like “Production Servers”, “Web Servers” or something else that describes the servers you are managing with this one “uber” MMC.

Next, in the Console1 MMC’s File menu, click “Save As…” and save the MMC with a descriptive file name. If you will be sharing this MMC with other team members, we recommend you save it to a well known network share folder so that others can benefit from it as well.

After you’ve saved the MMC, you’re basically done. In the future you simply locate your MMC file again and open it up to begin using it as you originally set it up. However, you may notice that every time you close the MMC, it will prompt you to save changes, even if you didn’t really change anything in it, other than the selected server. To prevent this from happening, in your MMC’s File menu, select “Options…”

In the Options dialog that opens, change the “Console mode” drop down to “User mode – limited access, single window” and check the “Do not save changes to this console”. Then click OK and save your MMC one more time. Going forward, you won’t be nagged to save changes to it whenever you close your MMC.

But what if you need to change your MMC in the future? After you set your MMC to “User mode” like above, in order to change it, you will need to right click on the MMC icon in Windows Explorer, and select “Author” from the context menu. This will open your MMC in a sort of “edit mode” that will allow you to make changes to it and save those changes for next time.

And that’s it! You now have one Services MMC to rule them all. Just remember if your team launches this single MMC file from the same location, any changes made will be visible to everyone the next time they open the MMC. And the last person to save changes to the MMC “wins” in case of edit conflicts.
Also, as you may have noticed when adding the Services snap-in above, there are many other snap-ins you can add to an MMC console, so you can create similar “uber” MMC console for everything from Remote Desktop connections, to Task Schedulers, and more!